2. About Transmission Holograms
Transmission holograms represent one of the two major types of holograms, the other being reflection holograms. All other holograms (rainbow holograms, computer generated holograms, multi-channel holograms, computer-generated holograms, etc.) are actually variations or hybrids of these two types of holograms.
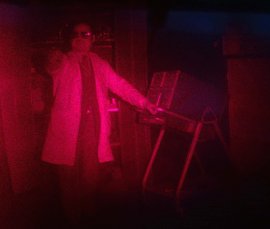
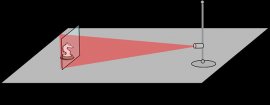
Our "Doctor Is In" transmission hologram features a life-size person inside a laboratory
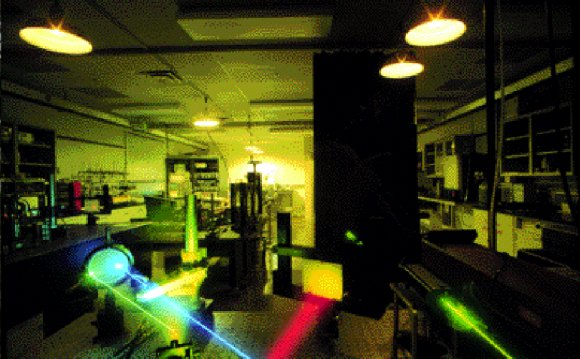
The typical transmission hologram is viewed with laser light, usually of the same type used to make the recording. This light is directed from behind the hologram and the image is transmitted to the observer’s side. The virtual image can be very sharp and deep. For example, through a small hologram, a full-size room with people in it can be seen as if the hologram were a window. Of course, making holograms of people requires a much more powerful laser and significant safety precautions, but you get the idea. Transmission holograms are like a window to another world. Remember Alice in Lewis Carroll's novel Through The Looking Glass?
There are some unique features of transmission holograms that"wow" the viewer:
- Captures an image of a subject much bigger than the holographic plate or film sheet that records the hologram. Reflection holograms cannot do this easily.
- Have an image can be projected onto a screen or other surface with a laser.
- Can be broken into small pieces whereby each piece still contains the entire image. Yes, that's right. If you were to smash a hologram with a hammer and then shine a laser through just one piece, the entire image can be still be projected and viewed.
- Can record more than one image on the same holographic plate of film sheet; in effect, adding a "channel" for subsequent images. When viewing the finished hologram, you can "tune" to different channels by rotating the hologram and see your different images!
 Notwithstanding the unique features above, transmission holograms are usually not the first hologram of choice for artists, hobbyists, and first-time holographers. The main reason for this is due the fact that transmission holograms must generally be viewed with laser light instead of white light. Practically speaking, this makes transmission holograms less convenient than reflection holograms to display.
3. Holography Supplies
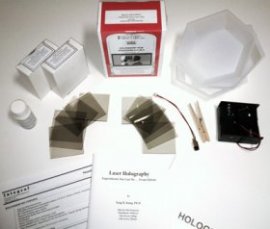
Our holograms kits include all the essentials you need for making holograms.
The Student HOLOKITTM contains all the essentials you need to make six kinds of holograms.
- Professional Recording Material
PFG-03M and PFG-01 emulsions both make excellent holograms, but PFG-01 is especially good for transmission holograms.
- Holography Diode Laser
Class IIIa, 4mW, 650nm (red), highly stabilized, adjustable collimating lens.
- Clothespin
Used to hold the laser.
- JD Processing Kit
Use the pre-measured JD-4 kit if using PFG-03M plates or JD-2 if using PFG-01 film or plates.
- PhotoFlo
Wetting solution to help the holograms dry cleaner.
- 5 Developer Trays
Three small ones, two large ones.
The above materials can all be found in the hologram kit or catalog provided by Integraf. While the HOLOKITS come standard with PFG-03M, you can request to substitute this emulsion with PFG-01 (with JD-2 developer).
 Other accessories generally recommended are a computer mouse pad, a cup of sand (salt or sugar will also work), a hardcover book (or piece of cardboard) to serve as a shutter, coins (or other appropriate object as the subject for your hologram), distilled water, and a hair dryer (optional). Again, please see "Simple Holography" or our step-by-step instructions to understand how these items are used.
4. Your Set Up
You're now ready to set up to make transmission holograms.
The only real difference between making transmission holograms versus reflection holograms lies in how you position the materials equipment on your holography work space for the exposure.
To illustrate how to make transmission holograms, let's compare the set up for making reflection holograms versus making transmission holograms.
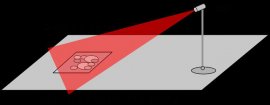
Set up for making reflection holograms. Note the order: laser light - holographic plates - object.
Reflection holograms. In making reflection holograms, the holographic plate is placed between the laser light and the object in one of two basic ways. The order from right to left is: object > holographic plate > laser. (a) From the top down at a 45 degree angle, with the holographic plate on top of flat objects, such as coins in this case; or (b) From the side for larger, bulkier objects, such as a chess piece example shown.
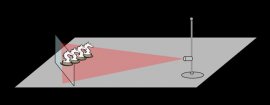
Transmission Holograms. In contrast, making transmission holograms requires the holographic plate to be placed behind the object and laser, or to the side at 45 degree angle or so. The idea is that the laser light that reflects off the object will interfere directly with the light coming from the laser in front of the plate and then get recorded as such. This creates the "deep scene" hologram.
In making transmission holograms, the order of the items is swapped so it's laser - object - plate, but at an off-angle.
There are two recommended set ups for making transmission holograms with a single laser beam (as opposed to split-beam using mirrors and lenses, etc.). The first is the "top-down" version, which is useful for deep scenes of flat objects. One can achieve depth of over 6 inches (15cm) with this method. The order from right to left is: holographic plate > object > laser. Note how the bulkier object (the chess piece) is off to the side, so as to avoid casting unnecessary shadows on to the plate.
An alternative set up is the "straight-on" or "same-plane" method, whereby the laser shines straight on from the same horizontal plane as the object and plate. The object and plate are split apart at about a 90 degree angle to each other, with the beam shining at each with equal intensity. This second method is appropriate for bulkier items. This set up helps prevent the object from casting too big a shadow on to the plate. After all, who wants to make a hologram of a shadow?
You can set up to make transmission holograms at home using holographic plates. To learn how to use holographic film instead of plates, see our article "How to Use Holographic Film".

Share this Post
latest post
-
 CNN hologram technology July 16, 2026
 -
 What is grating element? July 6, 2026
 -
 Grating Spectrometers June 26, 2026
 -
 How to Make Holograms for Fake ID? June 16, 2026
 -
 Holographic Packaging June 6, 2026
 -
 Holographic Pen May 27, 2026
 -
 Hologram image projector May 17, 2026
 -
 Hologram Jordan 13 May 7, 2026