 Starburst effects can add an interesting element to a photograph. In a dark, moody scene, it can add a dreamy, peaceful twinkle to the lights. In a daytime scene, a starburst effect from the sun can add drama and interest to otherwise uneventful skies.
Photographers used to use star or “cross” filters to achieve this effect. These were glass filters with a grid on the surface that created the “starburst” effect. While these filters created interesting starbursts, they also caused a rainbow-like effect in the light called dispersion as well as softness issues in the images. While you can still find these filters being used, you can create similar effects without filters simply by gaining an understanding of diffraction.
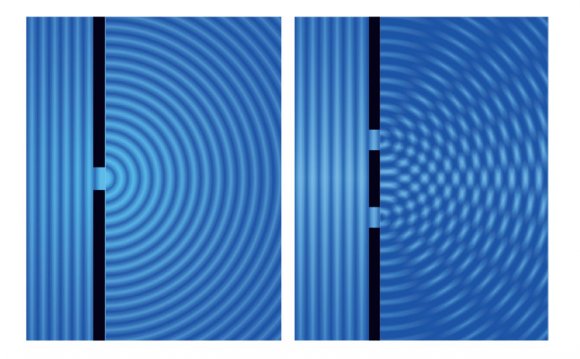
A starbust from a light source is the result of light diffraction. Diffraction is the slight bending of (light) waves around small obstacles and the spreading out of (light) waves past small openings. As light passes into your camera through a small opening, i.e. a small aperture at a low focal length, it bends around the edges of the blades and creates the “star” look. The number of rays from each starburst is related to the number of aperture blades in your lens. The more blades your lens has, the more “starburst” is possible. So if you want to switch up the look, experiment with different lenses as well as different apertures. Also, remember that the focal length also affects the size of the opening.
 Side Note: (feel free to skip unless you’re confused by the relationship between focal length, aperture, and the size of the opening): Think about the following equation: F-stop equals the focal length divided by the diameter aperture. If you keep the F-Stop the same, say at f/22 and you change the Focal length, from say 100mm to 50mm, the diameter of the aperture drops in half if you plug the numbers into the equation. With lower focal lengths (at the same F-Stop) creating smaller openings, so you should see more starburst at shorter lengths.
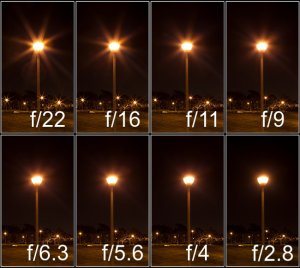
The following charts show the effect of aperture on the size of the starbursts. As you can see, the smaller the aperture, the more emphasized the starburst. The same concepts apply during the daytime as they do during the night time.

Diffraction is usually thought of as a negative phenomenon, as it can lead to a loss of overall sharpness in an image. [Rewind – Click here to read more about aperture diffraction and its effect on photography]. However, as with most other phenomena, you can use it to your advantage and enhance your repertoire of creative photography.
1) Use a Tripod and Remote Trigger – At such small apertures and such low light, you’re not going to get a crisp handheld shot, so you’ll need a tripod and a remote trigger. Any sturdy tripod will work, as will any reliable remote trigger. Here are a couple of recommendations: Remote Shutter Release Cord and Manfrotto Pro Tripod
If you don’t have either of these, you might be able to get away with setting your camera on a solid object and using the two second timer, however your composition options would be limited.
2) Set Camera Settings – For this type of shot, you’re going to need to use a small aperture of f/11 or smaller. The smaller you make your aperture, the more diffraction you’ll get and the more “starburst” you’ll see in your image. Also Remember that the lower your focal length, the smaller the physical opening of the aperture, so the more you zoom out, the more “starburst” you should see in your image.
 Set your ISO to a low number to avoid any unnecessary (and potentially detail damaging) grain. ISO 50 to ISO 400 (ideally ISO 50) are good numbers depending on how long you want your shutter speeds to be.
Your shutter speed will depend on the aperture and ISO you chose, as well as your desired amount of under/over exposure. The proper amount of over or under exposure will depend on your desired results, the amount of light in the scene, and the amount of contrast between the lights and the background. For most night scenes, you’ll want to be underexposed by around one and a half stops to maintain the night ambiance of the scene. Your shutter will likely be around 20-30 seconds for a scene like the one in the image above.
3) Turn on Your Highlight Alert – Most digital cameras have a highlight alert option that will show you when your highlights are blown out. This is important to turn on because you want to see if you’re blowing out, i.e. losing unrecoverable detail, in any parts of your image. In most instances, we’re okay with the centers of each starburst being blown out, but not objects around it.
3) Set your Focus – Your focus will depend on the distance of the subject from your camera. For wide landscape and cityscape scenes, you’ll likely be at infinity. Make sure you switch your focus to Manual on the lens to ensure that your camera doesn’t auto focus to the wrong plane. If each shot has 20-30 second shutters, small mistakes can be costly and frustrating.
4) Take the Picture, Adjust and Repeat – As you use your remote trigger to take the picture, make sure you don’t bump your tripod while the shutter is open. And unless you’re really experienced (or really lucky), that first image likely won’t come out exactly as desired, so just adjust and repeat until you get it.
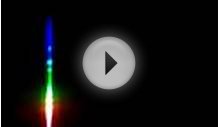
5) Experiment with Additional Creativity – Consider applying additional techniques such as light writing [rewind: click here to see our tutorial on light writing] and painting with light to add more interest to your photos. See the example below.
RELATED VIDEO

Share this Post
latest post
-
 What is grating element? July 6, 2026
 -
 Grating Spectrometers June 26, 2026
 -
 How to Make Holograms for Fake ID? June 16, 2026
 -
 Holographic Packaging June 6, 2026
 -
 Holographic Pen May 27, 2026
 -
 Hologram image projector May 17, 2026
 -
 Hologram Jordan 13 May 7, 2026
 -
 New hologram April 27, 2026